Unreal Engine 4: Generating a procedural terrain with an underwater world (Part 2) - Mesh Generation
Liana Pigeot
Published on February 14, 2018Start with Part 1 if you haven’t read it.
In part 1, we added Perlin noise to Unreal so we can easily use it in our code/blueprints. Now, the next step is to actually generate a mesh from it.
RuntimeMeshComponent
After a bit of research, I found this RuntimeMeshComponent on the marketplace that makes it possible to generate meshes at runtime, abstracting a bit of the low level stuff.
Problem is, it was only for Unreal 4.10-4.16, and I use 4.18. I decided to fork and update the project for newer versions of Unreal.
This component allows us to generate a mesh from a set of vertices, triangles, normals, etc.
What a mesh is
A mesh with the RuntimeMeshComponent is made of a few things:
- Vertices: These are all the individual points making up a mesh
- Triangles: These are the triangles linking vertices together to form the surface of the mesh
- Normals: These are normal vectors for each vertex. They are perpendicular to the triangle formed by their vertex. They’re used for lighting purposes
- Tangents: These are 2D vectors defining the orientation of the texture for a vertex.
- UV: These are the texture coordinates between 0 and 1 for each vertex.
- VertexColors: Those are the colors of each vertex
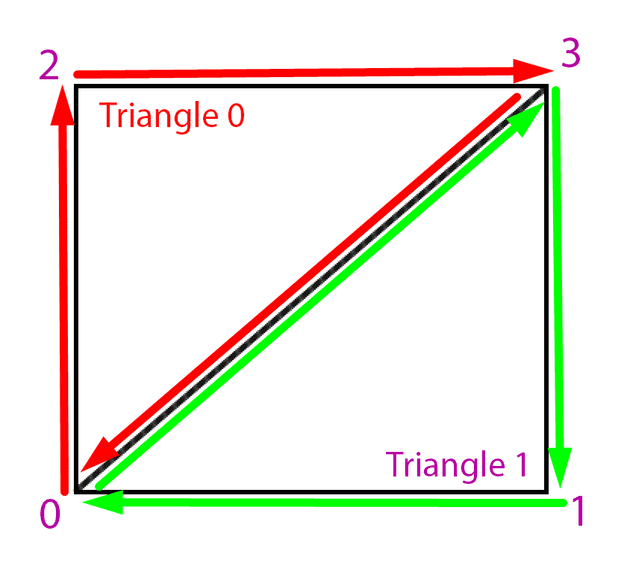
Let’s look at a very simple kind of mesh: A square made up of two triangles.
Our vertices go from left to right and bottom to top, so the first vertex is the bottom left one, then bottom right, then top left and top right.
Triangles need to be made of three vertices, and go counter-clockwise, so we can make our two triangles making up this square mesh:
- Triangle 1 goes from 0 to 2, then 2 to 3, and then back to 0
- Triangle 2 goes from 0 to 3, then 3 to 1, and then back to 0
Generating the vertices and triangles in code
In code, vertices and triangles are defined as arrays:
- The vertices array is an array of vectors. Each value in the array is a 3D vector that represents the position of a vertex
- The triangles array is an array of ints. Each value in the array is an index of the vertices array that corresponds to the point being used by the triangle
For example, in our case (using pseudo-code):
Array<Vector3> Vertices = (
	{0, 0, 0}, // Bottom left
	{1, 0, 0}, // Bottom right
	{0, 1, 0}, // Top left
	{1, 1, 0}  // Top right
)
Given those vertices, the Triangles array looks like so:
Array<int> Triangles = (
	0, 2, 3,
	0, 3, 1
);
Each value in this Triangles array is an index from the Vertices array. Each group of 3 values form a triangle, and all triangles are defined by listing their vertices counter-clockwise.
We’ll see about normals and other parameters later as they’re not immediately relevant to the mesh generation
Generating vertices from Perlin noise
To generate our terrain, we will need lots of Perlin noise values to make a decent mesh.
For simplicity, we can generate those values along a grid. Let’s say we’re sampling one perlin noise values every 100 Unreal units in x and y. We can generate those values in a two-dimensional loop:
UPerlinNoiseComponent* Noise; // A reference to our noise component
Noise = Cast<UPerlinNoiseComponent>(GetOwner()->GetComponentByClass(UPerlinNoiseComponent::StaticClass()));

TArray<FVector> Vertices;
int NoiseResolution = 300;
int TotalSizeToGenerate = 12000;
int NoiseSamplesPerLine = TotalSizeToGenerate / NoiseResolution;

// The number of vertices we'll have is the number of points in our [x,y] grid.
Vertices.Init(FVector(0, 0, 0), NoiseSamplesPerLine * NoiseSamplesPerLine);

for (int y = 0; y < NoiseSamplesPerLine; y ++) {
	for (int x = 0; x < NoiseSamplesPerLine; x ++) {
		float NoiseResult = Noise->GetValue(x + 0.1, y + 0.1, 1.0); // We have to add 0.1 because the noise function doesn't work with integers
		int index = x + y * NoiseSamplesPerLine;
		Vertices[index] = FVector(x * NoiseResolution, y * NoiseResolution, NoiseResult);
	}
}
This loop does a few things:
- Calculates the number of points we’ll need to generate depending on two options (
NoiseResolutionis the distance between two points, andTotalSizeToGenerateis how big you want your mesh to be). - Initialises the vertices array with the number of points we’ll need
- Loops over x and y to get noise values, adding them to the
Verticesarray
Now this is nice, but there are a few problems with this:
- The noise outputs values between -1 and 1, this won’t really be visible in our game
- We have no control over how far away the noise samples are
Let’s introduce a few more settings for that and clean the code a bit:
TArray<FVector> Vertices;
int NoiseResolution = 300;
int TotalSizeToGenerate = 12000;
int NoiseSamplesPerLine = TotalSizeToGenerate / NoiseResolution;

float NoiseInputScale = 0.01; // Making this smaller will "stretch" the perlin noise terrain
float NoiseOutputScale = 2000; // Making this bigger will scale the terrain's height

void GenerateVertices() {
	Vertices.Init(FVector(0, 0, 0), NoiseSamplesPerLine * NoiseSamplesPerLine);
	for (int y = 0; y < NoiseSamplesPerLine; y ++) {
		for (int x = 0; x < NoiseSamplesPerLine; x ++) {
			float NoiseResult = GetNoiseValueForGridCoordinates(x, y);
			int index = GetIndexForGridCoordinates(x, y);
			FVector2D Position = GetPositionForGridCoordinates(x, y);
			Vertices[index] = FVector(Position.X, Position.Y, NoiseResult);
			UV[index] = FVector2D(x, y);
		}
	}
}

// Returns the scaled noise value for grid coordinates [x,y]
float GetNoiseValueForGridCoordinates(int x, int y) {
	return Noise->GetValue(
		(x * NoiseInputScale) + 0.1,
		(y * NoiseInputScale) + 0.1
	) * NoiseOutputScale;
}

int GetIndexForGridCoordinates(int x, int y) {
	return x + y * NoiseSamplesPerLine;
}

FVector2D GetPositionForGridCoordinates(int x, int y) {
	return FVector2D(
		x * NoiseResolution,
		y * NoiseResolution
	);
}
This is the same code as before, but using the two new scale parameters, and refactored to be cleaner.
We are also now assigning UVs just to have some basic texture coordinates, this will make the texture of our material tile for every quad.
With that, we now have our noise generating output values that are in the range [-1000, 1000], which should be a lot more noticeable in Unreal. We can also scale the values given as input to the noise, which allows us to stretch or zoom the terrain (if the scale is very low, we will be taking very close points, whereas if the scale is high, we will be taking points that are very far apart and widely different).
Generating triangles
We can now start generating triangles using indexes of the vertices we just created (in a separate loop for simplicity), by iterating over each quad.
A quad is one square in our mesh grid (ie, [0, 0] to [1, 1]), and each quad contains two triangles (Like in the previous drawing).
TArray<int> Triangles;

void GenerateTriangles() {
	int QuadSize = 6; // This is the number of triangle indexes making up a quad (square section of the grid)
	int NumberOfQuadsPerLine = NoiseSamplesPerLine - 1; // We have one less quad per line than the amount of vertices, since each vertex is the start of a quad except the last ones
	// In our triangles array, we need 6 values per quad
	int TrianglesArraySize = NumberOfQuadsPerLine * NumberOfQuadsPerLine * QuadSize;
	Triangles.Init(0, TrianglesArraySize);

	for (int y = 0; y < NumberOfQuadsPerLine; y++) {
		for (int x = 0; x < NumberOfQuadsPerLine; x++) {
			int QuadIndex = x + y * NumberOfQuadsPerLine;
			int TriangleIndex = QuadIndex * QuadSize;

			// Getting the indexes of the four vertices making up this quad
			int bottomLeftIndex = GetIndexForGridCoordinates(x, y);
			int topLeftIndex = GetIndexForCoordinates(x, y + 1);
			int topRightIndex = GetIndexForCoordinates(x + 1, y + 1);
			int bottomRightIndex = GetIndexForCoordinates(x + 1, y);

			// Assigning the 6 triangle points to the corresponding vertex indexes, by going counter-clockwise.
			Triangles[TriangleIndex] = bottomLeftIndex;
			Triangles[TriangleIndex + 1] = topLeftIndex;
			Triangles[TriangleIndex + 2] = topRightIndex;
			Triangles[TriangleIndex + 3] = bottomLeftIndex;
			Triangles[TriangleIndex + 4] = topRightIndex;
			Triangles[TriangleIndex + 5] = bottomRightIndex;
		}
	}
}
With that, we have our triangles ready to use. Those two things are actually enough to create a basic mesh if we cheat for the values of the other parameters.
To generate an actual mesh, we only need to call the RuntimeMeshComponent CreateMeshSection function.
To install the RuntimeMeshComponent in your project, first download my updated version on Github, and follow this tutorial to install it, and this one to expose it to your C++
// We need a reference to the runtime mesh
URuntimeMeshComponent* RuntimeMesh = Cast<URuntimeMeshComponent>(GetOwner()->GetComponentByClass(URuntimeMeshComponent::StaticClass()));
int VerticesArraySize = NoiseSamplesPerLine * NoiseSamplesPerLine;

// These other values will be seen in a later part, for now their default value will do
TArray<FVector> Normals;
TArray<FRuntimeMeshTangent> Tangents;
TArray<FVector2D> UV;
TArray<FColor> VertexColors;

Normals.Init(FVector(0, 0, 1), VerticesArraySize);
Tangents.Init(FRuntimeMeshTangent(0, -1, 0), VerticesArraySize);
UV.Init(FVector2D(0, 0), VerticesArraySize);
VertexColors.Init(FColor::White, VerticesArraySize);

void GenerateMesh() {
	RuntimeMesh->CreateMeshSection(0,
		Vertices,
		Triangles,
		Normals,
		UV,
		VertexColors,
		Tangents,
		true, EUpdateFrequency::Infrequent
	);
}

void GenerateMap() {
	GenerateTriangles();
	GenerateVertices();
	GenerateMesh();
}

GenerateMap();
Putting all that code in an actor component, it becomes possible to generate terrain by giving that component to an actor that also has the PerlinNoiseComponent and RuntimeMeshComponent.
I’ve put the full TerrainComponent code explained here as a component on Github.
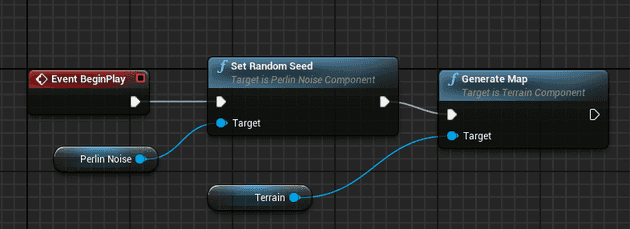
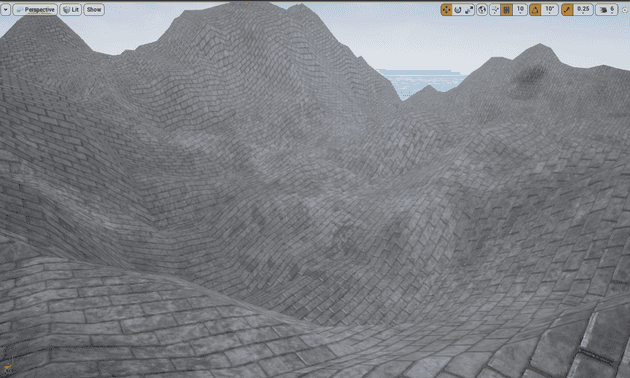
As an example, if you expose your GenerateMap function to blueprints you can create a terrain that way:
And this is the result:


